Getting out of the rut: 5 ways to color your doodles
It is so easy to get stuck in doing the same things over and over. It is in our nature as humans. The familiar things, the things we know we can do relatively well and with some confidence, are what many of us tend to gravitate towards. Breaking out of our comfort zones and trying something different and untested can be a daunting task. Even if it is just changing up your coloring routine.
That is why I went ahead and tested some new things, five things in fact, so you can check out my results before dipping your toes in untested waters. The habits I am guilty of is coloring my drawings in 2-3 different ways. Solid colors with a strong black border, a mixture of multiple layers of varying opacity – to reach a natural feeling skin tone and texture or working a lot with a glitch-inspired brush sets and other abstract tools.
So let us shake things up together. Here are the five methods for coloring I tested and what I thought of them after giving it a try. I have also included an infographic with five general tips for Sketchbook users.
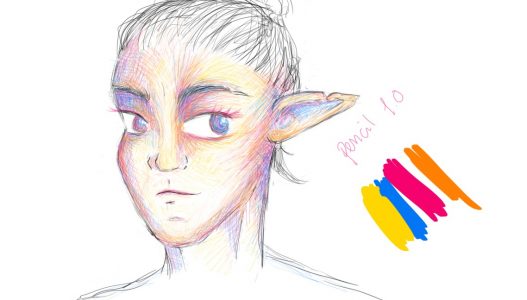
Bright Pencil coloring
The Method: For this doodle I picked the basic standard pencil as my only tool, and four high contrast colors. Greatly inspired by the vaporwave aesthetic, I went with a blue, a pink, an orange and a yellow as my colors of choice. Layering the colors without blocking out the white background, I created a very vibrant and fun result. Creating shadow and dept in the coloring, despite the high contrast of the colors was both challenging and fun. I worked in short, linear strokes and criss-cross patterns, allowing the background to create highlights.
The Final Thoughts: I loved this test, and I am going to do more doodles in this style for sure! Experimenting with this method on a darker background is something I want to try, with the sketch being done in white and see where that takes me.

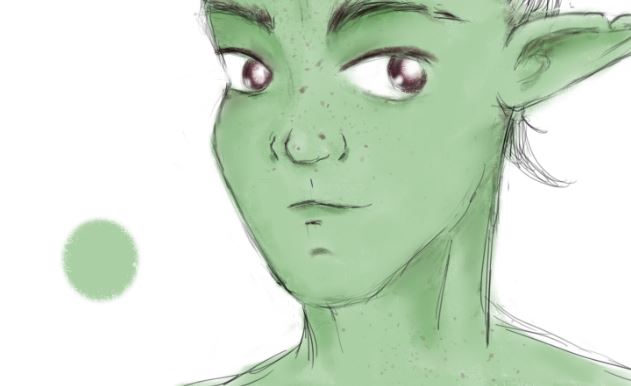
Coloring with the Dry Marker
The Method: This time I decided to use the Dry Marker pen from the Texture Essentials set, because it is a tool I have never picked before. I mean – why would you want to draw with a dry marker? My sketch that I am using for all five tests is a little elf I doodled during a Dungeons and Dragons session, and I used this test to make the elf look a little goblin instead. I was pleasantly surprised with the result, as the texture of the marker created a very skin like finish. Always looking for great tools to create realistic skin textures, this was a great discovery.
The Final Thoughts: This test may not look particularly ground-breaking, but sometimes using a new tool can make all the difference. In a piece of software with thousands of possible combinations of brushes and colours, it is so easy to just use your favorites over and over. Consciously trying new things requires energy that may not be available when we sit down to doodle after a long day. However, I encourage you to pick up the Dry Marker and see if it has a eureka moment in store for you too!
Watercolor coloring
The Method: Many of the watercolor inspired brushes have great properties for layering color and creating both very vibrant but also very muted colours. Claiming I have not used this kind of brushes before would be a stretch, but Water Color Like from the Inkered set was news up until very recently. What makes it special in my book is the colourless area in the middle of the brush. This feature lets me work with strong colours and still get a low opacity result, making it easier to blend colors and create beautiful, soft washes of color. I also find this tool to be very sensitive to pressure, giving great control of the result.
The Final Thoughts: Watercolor brushes is becoming a favorite with me, as I continue to discover new uses for them. I enjoy the ability to quickly color in large areas, without creating a “block” of the same color, making it great for both sky and faces – two things I love to draw.

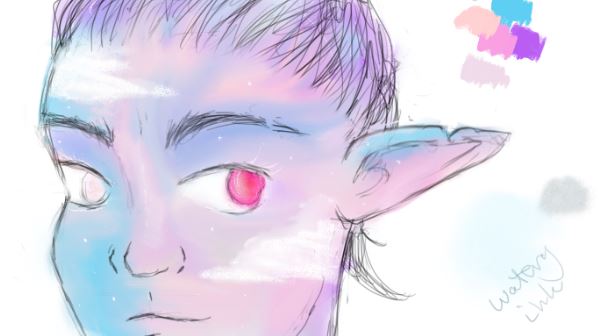
Pastel night coloring
The Method: Like the bright pencils, this was all about the color choice. Inspired by winter sunsets, I went ahead and picked four colors. Three light pastels and a brighter purple. My idea was to use these sunset colors to bring out the light and shaded parts of the face, without falling into my habit of attempting to create a realistic result. The colors was applied with the Dry Brush Streaky and the Watery Ink from the Inktober brush set and then I used the smudge and blend tools from the basic set to mix the colors. I went ahead and added some puffy white clouds and stars, while coloring one of the eyes a bright, sinking sun red and the other a milky moon color, throwing all pretence of “natural” overboard.
The Final Thoughts: I had a great time with this test, and I can see myself doing it again with other themes, such a sea-greens, jewel tones or the same colors as the Bright Pencils. The possibilities are endless, as the point of this exercise was to flip your habits over. If you like realism, try letting go of reality. Enjoy straight lines? Disable your stroke stabilizer! If you like to splatter and let colors flow here and there, challenge yourself to color within the lines. I think you get the picture.
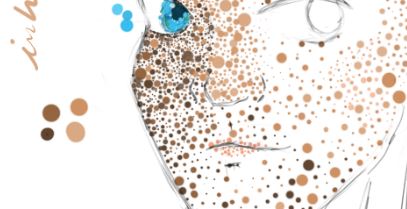
Dots! More dots! Never stop dots!
The Method: I have watched the sped-up recording of this coloring more times than I care to admit. Watching the canvas fill with dots is just so satisfying to my brain. I encourage you to try the same. This was both an inspiring and relaxing experience and ended up putting down little dots until my hand was cramping. Let yourself be inspired by the masters of the pointillism movement and let your dots overlap. Or do what I did and try to let the background come through. For this I used the Inking Pen from the Basic set because it is pressure sensitive and allows you to make dots in different sizes without having to change your brush size.
The Final Thoughts: I am so happy I tried this, and I am going to be making more dots. So many dots. And if you get the “more dots” reference, there is a special gold star for you! A way to shake this method up, could be to use some of the stamp brushes like the star or flower from the Manga Stamps set or the heart from the Korean Storybook set.
Thanks for tagging along for this inspiration-ride. If you read all of this and want to get into drawing digitally so you also can have all this potential fun, but cannot seem to get started, follow this link to my post about how to get started with drawing as adult.
Make sure to check the five tips in the infographic below and in the meantime, happy doodling!

5 great short cuts and tips for Sketchbook Beginners
